Showing posts with label iphone. Show all posts

Saturday, May 28, 2022

Acuter Maksy 60 at Sun Baked Observatory


Above: attempting high magnification at the Sun's limb produced this unusual appearance

Left: at 20mm EP projection, the solar disk was overexposed and getting the iPhone to compensate was insufficient

Trials & Tribulations of the Acuter Maksy 60 at Sun Baked Observatory

The Acuter Maksy 60 is being tuned for solar work. A number of fixes are needed before this telescope will be fully up and running.

Here's a List of Thirteen Anomalies

* the small tripod mount is insufficient to hold the telescope and the weight of the iPhone

* the small tripod mount is incapable of making the fine motions needed for adjustments to image positioning

* The small tripod did not fully fit the observatory platform

* the stock iPhone mount failed - mount number one with the stock bands was not fully adjustable and the phone camera would not stay over the eyepiece at the proper position

* The 2nd iPhone mount failed - it pressed on the side of the iPhone against the function buttons and locked p the phone

* The 3rd iPhone mount failed, the lock holding the phone was not able to have fine tuning

* The 4th phone mount failed, it was too heavy

* Just as the project was getting started, the sun moved into a position blocked by the roof

* The sun features were relatively void due to viewing the sun through the clouds and haze

* The iPhone continued to fail as any touch to the screen activated some unwanted feature

* The iPhone screen was invisible in the bright sun - a shield was fabricated but it too had too many reflections to see anything

* Two different iPhones both had the same problems

* The observatory platform needs to be completed in construction and moved to an ideal location

For more information about astro imaging, follow the link:

https://otisastro.blogspot.com/

Monday, July 20, 2015

Moon Venus Conjunction

MOON VENUS CONJUNCTION Saturday's lucky catch was a crescent Moon and Venus conjunction - a beautiful sight early in the evening before both celestial objects set in the West. Cell phone camera settings were ISO 80, f2.2 at 1/4th second exposure.


Photos were captured with an iPhone 6+ camera on Saturday July 18th 2015. The bottom view is zoomed and processed using iMac's iPhoto. The time was 9:57 pm CDT. An hour later the objects were no longer visible. Sunset was around 9:17 CDT.

Tuesday, January 6, 2015

Space1 Test Spacecraft

SPACE1 TEST SPACE CRAFT

Space1 has a continually growing and powerful collection of proportional test spacecraft helping to move towards space tourism.

The space inventory includes 15 space tourism and test rockets and six flyable Space Places, designed to serve as outposts in space and space stations. Space tourism, flights through Micro Space, Next Space, Near Space and beyond are potential reality for the public in the near future.

The top photo shows the pressure chambers from a Micro Spacecraft test in which fuel is automatically beamed up to the spacecraft through the atmosphere. This allows for a lighter craft to be powered in flight without carrying onboard fuel.

The second photo shows a very small nano flying test platform, with a backdrop of an Apple iPhone 5. This four engine flight model is used for testing below 1000 feet of atmosphere. Such vehicles can launch from skyscrapers at thousands of feet elevation resulting in nearly a mile of vertical test flight.

SPACE1 CRAFT INVENTORY
15 - Safety Rockets
02 - Two-Engine Space Place
02 - Four-Engine Nano Space Place
01 - Four-Engine Mid-Size Space Place
01 - Six-Engine Large Space Place

Sunday, November 16, 2014

Humanoido Labs Update

HUMANOIDO LABS UPDATE
First new robot at the new lab
Humanoido introduced three new international labs in 2014. The recent move to new facilities provides more space and was completed in November of 2014. Work is progressing to refine the setup within each laboratory.

Astro Aeronautics Lab (Intl Taiwan Lab 63 - TAL)
The Astro Aeronautic Laboratory officially opened with its first experiment on Thursday November 13, 2014.

http://humanoidolabs.blogspot.tw/2014/11/iphone-pocket-telescope.html
iPhone Pocket Telescope

DeckLab in the Sky (Intl Taiwan Lab 62 - TDL)

November 4th 2014
http://humanoidolabs.blogspot.tw/2014/11/decklab-in-sky.html
Rocket Lab (Intl Taiwan Lab 61 - TRL)
 September 24th, 2014
http://humanoidolabs.blogspot.tw/2014/11/decklab-in-sky.html

Moving into the new facilities - panoramic view
Rocket Lab is located on the entire second floor. This facility has resources in mechanics, electronics, digital computing, the Big Brain, parts and components, all the Micro Space equipment, inventions, rockets, and a series of working spacecraft. Two large work benches are currently provided for work. The laboratory also includes guest space for scientists.

Labs Lists
HUMANOIDO LABS LIST
This information includes Primary Functions, and Nostalgia.
http://humanoidolabs.blogspot.tw/2012/06/humanoido-labs-list.html
This large post describes 58 labs and includes the evolution of the lab and how the idea originated.

Humanoido Lab List
http://humanoidolabs.blogspot.tw/2013/07/humanoido-lab-list.html

This post describes 60 labs, updating with the newest labs in 2013.

Humanoido Labs Update
Adds three new labs to the list in 2014. 
http://humanoidolabs.blogspot.tw/2014/11/humanoido-labs-update.html


Thursday, November 13, 2014

iPhone Pocket Telescope

IPHONE POCKET TELESCOPE

As put together by Humanoido in the new Astro Aeronautics Lab, the iPhone pocket telescope is designed as a small portable telescope that can shoot great images without a tripod or special mounting. This is accomplished using electronic and combined software image stabilization and the additional camera features of the new iPhone 6 Plus.


iPhone view with stock lens
The phone, telescope tube assembly, and telescope clip all fit easily into a pocket. The US$13 telescope is a barrel, with focus, that threads into a clip which attaches it to the iPhone.

The tube rotates with a scale from 3 meters to infinity. The iPhone provides auto focus which works well through the telescope.

The photos shown here are all from the unit hand held. Note the remarkable sharpness obtained as a product of the mobile phone and the lens quality.


Telescope view at 8x
The telescope, made of coated precision glass lenses, has 8x magnification at F1.1 and the iPhone has 3X zoom, giving EFL values ranging from 8 to 24X on a sliding scale. Astronomically speaking, this should be enough scale to detect rings around Saturn, cloud belts on Jupiter, the Galilean Moons, and great detail on the Earth's Moon. It will also be exceptionally handy for capturing special selected events like occultations of stars, planets, and moons plus solar and lunar eclipses. Note: solar eclipses will require the use of special heat absorbing and light absorbing features.

Our first test zeroed in on a spherical water tank off in the
The telescope at 24x using 3x zoom
distance. This was shot with the iPhone's normal camera lens, the telescope at its standard 8x and the phones 3x zoom. The round tank is visible approximately in the center of the photo.


The next photo shows the tank view at 8x through the telescope with no zoom. As the telescope is fitted, there is some vignetting though very slight near the edges. The depth of field is focused directly on the tank.

The telescope view at 24x using the Apple camera zoom is remarkable for a hand held image, showing sharpness. The camera cost NT$398 and was missing the tripod and the mobile phone mount. This prompted the discovery of the telescope to function well in a hand held mode.

In the future, the telescope and camera pair will be paced during the first clear nights when the Moon and brighter planets are visible.

Monday, December 23, 2013

FM Radio Station Part 3 Assembly & Tips

Fully assembled and ready for testing, the FM transmitter radio station is shown with a potential cabinet housing. Note how the microphone is repositioned top side for ease of positioning inside and through the yellow cabinet.
assembly and tips
HOW TO BUILD YOUR OWN FM RADIO STATION TRANSMITTER PART 3

PARTY TIME!!! Today is a solder party. Get out your guns (soldering guns) and prepare to melt some metal, putting metal (tin) on metal (copper).

Tuning the frequency
By a bit of trial and error plus observation with a nearby FM radio receiver, it is possible to tune the FM transmitter. Using the coil, either expand or compress the wire coils to change the frequency. A closer wire gap give a lower frequency and a loose wider spacing gap gives a higher frequency.

The completed solder side of the printed circuit board with a green loop antenna about 2.75-inches high and a microphone set outwards on one side to facilitate a good fit through the cabinet top. Prime use of this project is to fulfill the authors objective to own and operate a tiny radio station (at the toy level) - in this case, a tiny exampling FM band transmitter that can send broadcasting from one side of the table to the other side.

Apps won't end there as the transmitter can have audio signal input into its stage, such as a Parallax Propeller chip's voice speech synthesizer signal inside the electric brain in a jar, and then transmit a speech signal through the jar, speaking wireless into a nearby radio. Building one transmitter is very cost effective at US$4.
When soldering the electrolytic capacitors and the transistors, use a heat sink on each of the wire leads to prevent component damage from heat.

It is also possible to change the value of the ceramic capacitor which is in parallel with the coil. Some designs use a tunable variable capacitor to do the tuning. In this case, the variable capacitor would have a tunable range from 0 to 10 pF. Since this transmitter has no requirements for specific FM frequencies, the variable capacitor is not needed.

Experiment with the coil spacing first to determine the range. Keep the receiver at distance from the transmitter to minimize the reception of spurious radio signals. Make sure you've found the primary signal which will have the greatest signal strength.

Reference this image showing a different orientation for clarity, to the photo in post part number 2 for circuit path positions. Note the coil spacing to change the frequency to a "quiet spot" on the upper FM dial.
The 10 pF capacitor is set to match the number of turns on the coil. With a greater capacitor value such as 20 or 50, the number of coil turns would be too much.

Antenna Length
First, here are some "getting started" approximate values already calculated for some frequencies. A full wave antenna for 98 Mhz, the center of the FM band, would be 119 inches. A half wave would be 59 inches. A quarter wave antenna for 98 Mhz would be 29 inches long. Try an eighth wave antenna at 14 inches long or a sixteenth wave antenna at 7 inches.

Online Whip Antenna Calculator
http://www.csgnetwork.com/antennagenericfreqlencalc.html
For more precise values, enter the frequency and the online program will calculate half and quarter wavelength whip antenna size. Requires browsers with enabled Javascript. "This calculator is designed to give the vertical length (height) of a particular whip type antenna, or the frequency of it. Enter one (only one) value, the desired frequency or the antenna length in any length field. Click on Calculate and the opposite value will be displayed in feet and inches or frequency in megahertz (Mhz). These are considered as generic calculations and you may wish to use them to learn general information about the antenna structure you are contemplating. Click on Clear Values to prepare for new calculations. Any antenna created with this calculator MUST be fine tuned for VSWR. None of the calculations are rounded or massaged and all calculated results are raw data."

Frequency Stability
The frequency may drift as the battery voltage becomes less. This is expected with this simple design. To offer more regulation, one could use a regulated power supply instead of the battery. The simple design presented here for exampling will use fresh batteries and some frequency drift will be expected. Do not use an AC adapter as these are generally not regulated and introduce interference.

Use with iPod, iPhone, iPad
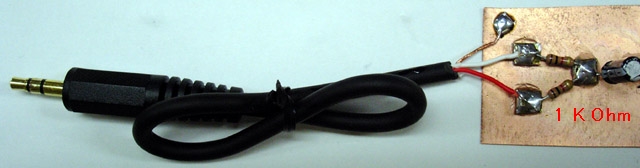
"The earlier model of iPod has an automatic shut-down system in it. When you pull out the plug of your headphone, it automatically stops working. When the left and right channels are short-circuited, the same thing happens. Presumably, you can use a stereo cable and solder the left (white) and right (red) lead together. Please use the left channel lead (white) only. Usually the left output is compatible with mono audio. If you, however, insist to mix the left and right output of your audio source into the transmitter, make a simple "interface" like this." Source: http://www.translocal.jp/radio/micro/howtosimplestTX.html

Radio Station Parts List
1 Resistor 820 Ohm
1 Resistor 4.7 K
1 Resistor 3.3K
1 Resistor 10K
1 Resistor 220K
1 Resistor 1K
1 Capacitor Ceramic Disc 10 pF
1 Capacitor Ceramic Disc .001 uF (102)
1 Capacitor Ceramic Disc .01 uF (103)
2 Capacitor Electrolytic 4.7 uF
1 Transistor 2SC1675 (or 2SC829) Q1
1 Transistor CS9013 Q2
1 Antenna Wire 16"
1 Coil (see text)
1 Electret Microphone
1 Printed Circuit Board
1 Enclosure
1 Printed Panel

Although controls are not necessary, adding a power switch and other capabilities may be desirable.

Spartan Version
On/Off Switch
A very spartan version with rudimentary controls is possible by using a rectangular project box with a hole for the mic protrusion and a hole for the on/off battery switch.

Basic Three Version
On/Off Switch
On the Air LED
Mute Switch
The on/off is a toggle switch wired to turn the 9 volt battery supply on or off.

The next upgrade can include a red LED for "on the air" monitor. This would wire in with the on/off switch and a dropping resistor to the LED.

Another handy feature is an audible mute switch. This would cut out the microphone and switch to a resistor with the same resistance as the microphone.

Deluxe Version
On/Off Switch
On the Air Red LED
Mic Mute
Variable Volume Control
External Sound Input
Signal Strength
Amplifier Monitor
Headset for Amp Monitor
External Power Supply
Switch from 3V, 6V, 9V (regulates output power)
2 Sound Source Mixer
External Antenna 1 or 2 

Band - With different switchable "band" coils, it would be possible to change the transmitting frequency.

Trim - With a variable 0 to 20 pF capacitor, it would be possible to tune the transmitting frequency.

Clock - with added processor
Compass - with added processor

SOURCES
http://www.translocal.jp/radio/micro/howtosimplestTX.html

FM Radio Station Part 5 Index
http://humanoidolabs.blogspot.tw/2013/12/fm-radio-station-part-5-index.html 

Monday, January 7, 2013

Big Brain Gains New AI Friend Siri

BIG BRAIN GAINS NEW AI FRIEND "SIRI"
The day has arrived: a new artificial intelligence friend gained by the Big Brain machine is Siri, the intelligence that lives inside the new Apple iPhone.

Siri is speech based and with access to the web, ability to do things by your command, and its uncanny capability to successfully and reliably answer questions gives it the ability to communicate unlimited volumes of knowledge and do useful work for the iPhone user.

Some of the functions handled by Siri:

http://www.apple.com/ios/siri/
http://osxdaily.com/2012/10/04/7-good-uses-of-siri/

Interfacing
Speech interfacing between the Big Brain machine intelligence (Parallax Propeller chip based) and Apple Siri software intelligence is made possible through audible language - simple speaking and listening. Big Brain asks questions and Siri provides answers. This is helpful when the Big Brain requests running apps, monitoring weather, checking internet, sending messages, checking mail, dialing phone numbers, performing calculations, doing conversions, checking current date and time, answering specific research inquiries and opening up all new doors of opportunity.

Match Made in Heaven?
Connecting Machine Intelligences can lead to many new opportunities so stay tuned to see what happens when we develop experiments along these lines. Want Siri? Siri is already installed in the new Apple iPhone 5.

The Future
Siri is also coming to Apple's desktop and portable computers in the near future. Versions are available for the ipad.

http://techcrunch.com/2012/11/19/apples-os-x-10-9-reportedly-bringing-siri-maps-integration-to-the-mac/

http://en.wikipedia.org/wiki/Siri_software

About Siri 
(pronounced /ˈsɪri/) (English: Speech Interpretation and Recognition Interface) is an intelligent personal assistant and knowledge navigator which works as an application for Apple's iOS. The application uses a natural language user interface to answer questions, make recommendations, and perform actions by delegating requests to a set of Web services.

Adapting
Apple claims that the software adapts to the user's individual preferences over time and personalizes the results and performing tasks such as finding recommendations for nearby restaurants or getting directions.

Controlling Siri
There's no need to use messy soldered wires and dig into the electronics. Keeping it simple, with a robot servo on hand and without hacking the iPhone, a Parallax Propeller chip can turn a Parallax servo horn to mechanically push and activate iPhone's button. A small round piece of cork or rubber attached to the button helps preserve the surface of the switch. The Parallax OBEX routine moves the servo a small amount and a simple timing algorithm keeps track of the hold-down time.

Method Two
Another simple option completely bypasses the new iPhone's mechanical switch. It uses the free "built into the OS" virtual on-screen assisted touch-switch and requires a small setup. Setup is simple. Go to Settings, General, Accessibility, turn on AssistiveTouch, go back to home, and position the Power Ball to an unused space.

Now put a small stylus on the servo to tap the Power Ball and the Siri button will come up in the same place every time. Match this position with the Power Ball or a servo. Now the servo(s) can use the stylus to activate both the Power Ball switch and Siri when necessary. The details can be worked out with position and a Propeller chip controlling servo(s), timing, and audio.  

Other Phones
Google other smart phones and check Youtube for phone comparisons to SIRI. Some phones use their own version similar to SIRI and at least one phone is running a version provided by Google.